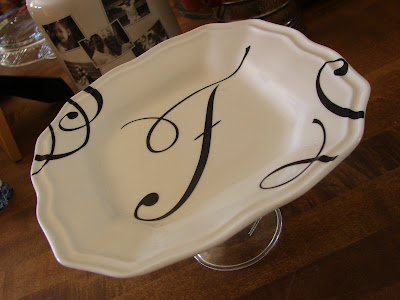
Ever need just a pretty little place to toss your loose change, a piece of jewelry, random Legos, hold soaps in the bathroom or what-have-you? Well, I recently made something just perfect for that: these little pedestal plates.
 I saw this idea from a friend's facebook page and couldn't resist making some of my own. I found these pretty initial plates at Hobby Lobby for just $5 and the glass candle holders came from the Dollar Tree...for $1, of course:)
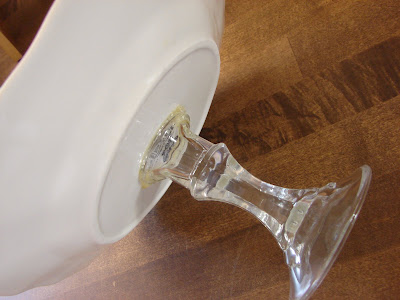
 I simply used Gorilla Glue around the top of the candle holder and stuck it to the center of the bottom of the plate. I balanced a couple of heavy books on it overnight for good measure and then it was good to go.
 Of course, when I saw these blue and white plates at Target (for $3) I had to have one. Won't this look pretty in the kitchen with some fruit? Or for serving snacks guests?
 Another place to look for very inexpensive pieces to make these with would be thrift stores. My friend found glass candle holders there for less than $1. And you know how you're always seeing *just one* of a pretty plate and don't know what to do with just one~this would be a great idea for that!
 {One little side note for you: when the Gorilla Glue dried it sort of bubbled up around the top of the candle holder, but when it's completely dry you can take a box knife or something similar and just cut those little dried bubbles right off}.
 I saw this idea from a friend's facebook page and couldn't resist making some of my own. I found these pretty initial plates at Hobby Lobby for just $5 and the glass candle holders came from the Dollar Tree...for $1, of course:)
  I simply used Gorilla Glue around the top of the candle holder and stuck it to the center of the bottom of the plate. I balanced a couple of heavy books on it overnight for good measure and then it was good to go.
  Of course, when I saw these blue and white plates at Target (for $3) I had to have one. Won't this look pretty in the kitchen with some fruit? Or for serving snacks guests?
  Another place to look for very inexpensive pieces to make these with would be thrift stores. My friend found glass candle holders there for less than $1. And you know how you're always seeing *just one* of a pretty plate and don't know what to do with just one~this would be a great idea for that!
 {One little side note for you: when the Gorilla Glue dried it sort of bubbled up around the top of the candle holder, but when it's completely dry you can take a box knife or something similar and just cut those little dried bubbles right off}.