It all started down on the farm in Arkansas, well, technically Pocola, Oklahoma (we're so close, you know)...


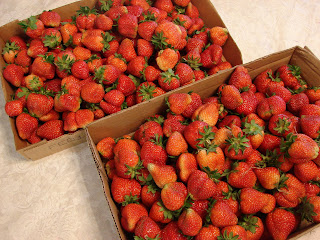
 I mean, look at that!! Nature's very own valentine! It's just perfect:)
 The berries were so gorgeous and yummy, we got a little carried away. We picked waaaaay more than we needed for that simple strawberry shortcake we were going to make.
 So I decided that my mom should teach me how to make jam...heehee! I really was surprised at how simple the process actually is, it just takes a little time. And really that wasn't too bad either: it took us about 2 hours to make 3 batches (according to the Sure Jell box recipe).
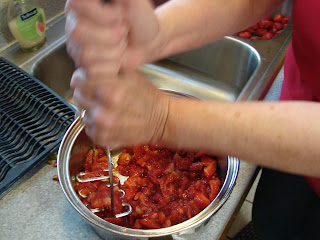
 1. First I hulled the strawberries.
 3. Next, we sliced them up and squished them really good with a potato masher~just until they started getting juicy.
 4. We put 5 cups of smashed berries into the stockpot with 1/4 cup lemon juice and 1 box of Sure Jell Pectin. Stir continually until this mixture comes to a boil.
 5. Then add 7 cups of sugar (I know, I was shocked, too!!!). I'll never look at jam the same!
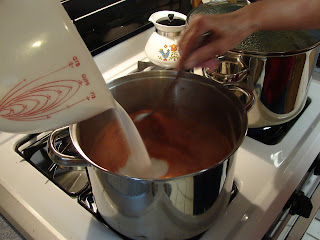 6. Stir this until it comes to a rolling boil again, and keep at a full boil for 1 minute. Skim any foam off of the top.
  We rounded up every jar my mom had (plus a box I picked up at the store) and we still ran out of jars! Our total came to 28+ the extra:)
We went berry picking yesterday~strawberries!! And, oh my, were they beautiful!!
I mean, look at that!! Nature's very own valentine! It's just perfect:)The berries were so gorgeous and yummy, we got a little carried away. We picked waaaaay more than we needed for that simple strawberry shortcake we were going to make.So I decided that my mom should teach me how to make jam...heehee! I really was surprised at how simple the process actually is, it just takes a little time. And really that wasn't too bad either: it took us about 2 hours to make 3 batches (according to the Sure Jell box recipe). 1. First I hulled the strawberries.2. Then we washed them~2x~they had a lot of dirt from the fields
3. Next, we sliced them up and squished them really good with a potato masher~just until they started getting juicy. 4. We put 5 cups of smashed berries into the stockpot with 1/4 cup lemon juice and 1 box of Sure Jell Pectin. Stir continually until this mixture comes to a boil. 5. Then add 7 cups of sugar (I know, I was shocked, too!!!). I'll never look at jam the same!6. Stir this until it comes to a rolling boil again, and keep at a full boil for 1 minute. Skim any foam off of the top. 7. Now you're ready to fill your jars (which have been in a pot of low boiling water all this time, of course).  8. Fill each jar to the top (a jar filler-thingy really helps!); be sure to wipe any sticky off of the rim of the jar before putting on the lid and cap. Screw the cap on tightly and set aside to let it seal. I love hearing those little *pops*!
8. Fill each jar to the top (a jar filler-thingy really helps!); be sure to wipe any sticky off of the rim of the jar before putting on the lid and cap. Screw the cap on tightly and set aside to let it seal. I love hearing those little *pops*!9. Enjoy your beautiful jars of jam!!!
We rounded up every jar my mom had (plus a box I picked up at the store) and we still ran out of jars! Our total came to 28+ the extra:) I had so much fun~although I'm sure I wore my mom out! But now I know how to make strawberry jam~yea!! I'm looking forward to more berry picking this year.