
My *New* Upcycled Bed & Our Bedroom


I have been meaning to show you this room for months now...and it just hasn't happened.  Every time I thought to take pictures some part of the room would be a mess, you know?  But this week I finally got pictures!

First of all we have to start with these gorgeous old doors:

When we moved at the end of last summer we had sold our four-poster bed beforehand, wanting to buy something different that wasn't so difficult to maneuver around ceiling fans.  After shopping around and not finding anything that 1.)was in our budget or 2.) wasn't backordered for months, I told Vince I wanted to do something totally different.  I wanted to upcycle something old for a headboard.  He wasn't so sure when I started rambling about things like old doors or wrought iron gates, but the next week he was driving by our favorite *junk* store and saw this pair of doors.  We snatched them right up!
Look at these beautiful door knobs on them!  And the keyholes...so pretty!
Now let's go inside to the master bedroom.  The previous homeowners had painted it a very dark putty-sort of color.  It really shrunk the room.


We repainted it a much lighter color, a shade of taupe (can't remember the exact name right now).  It really opened up and brightened up the room!  Vince mounted the doors onto the wall and we picked up a bed frame at the same junk store.  Voila!  A brand new (and unique) bed for only $45!!

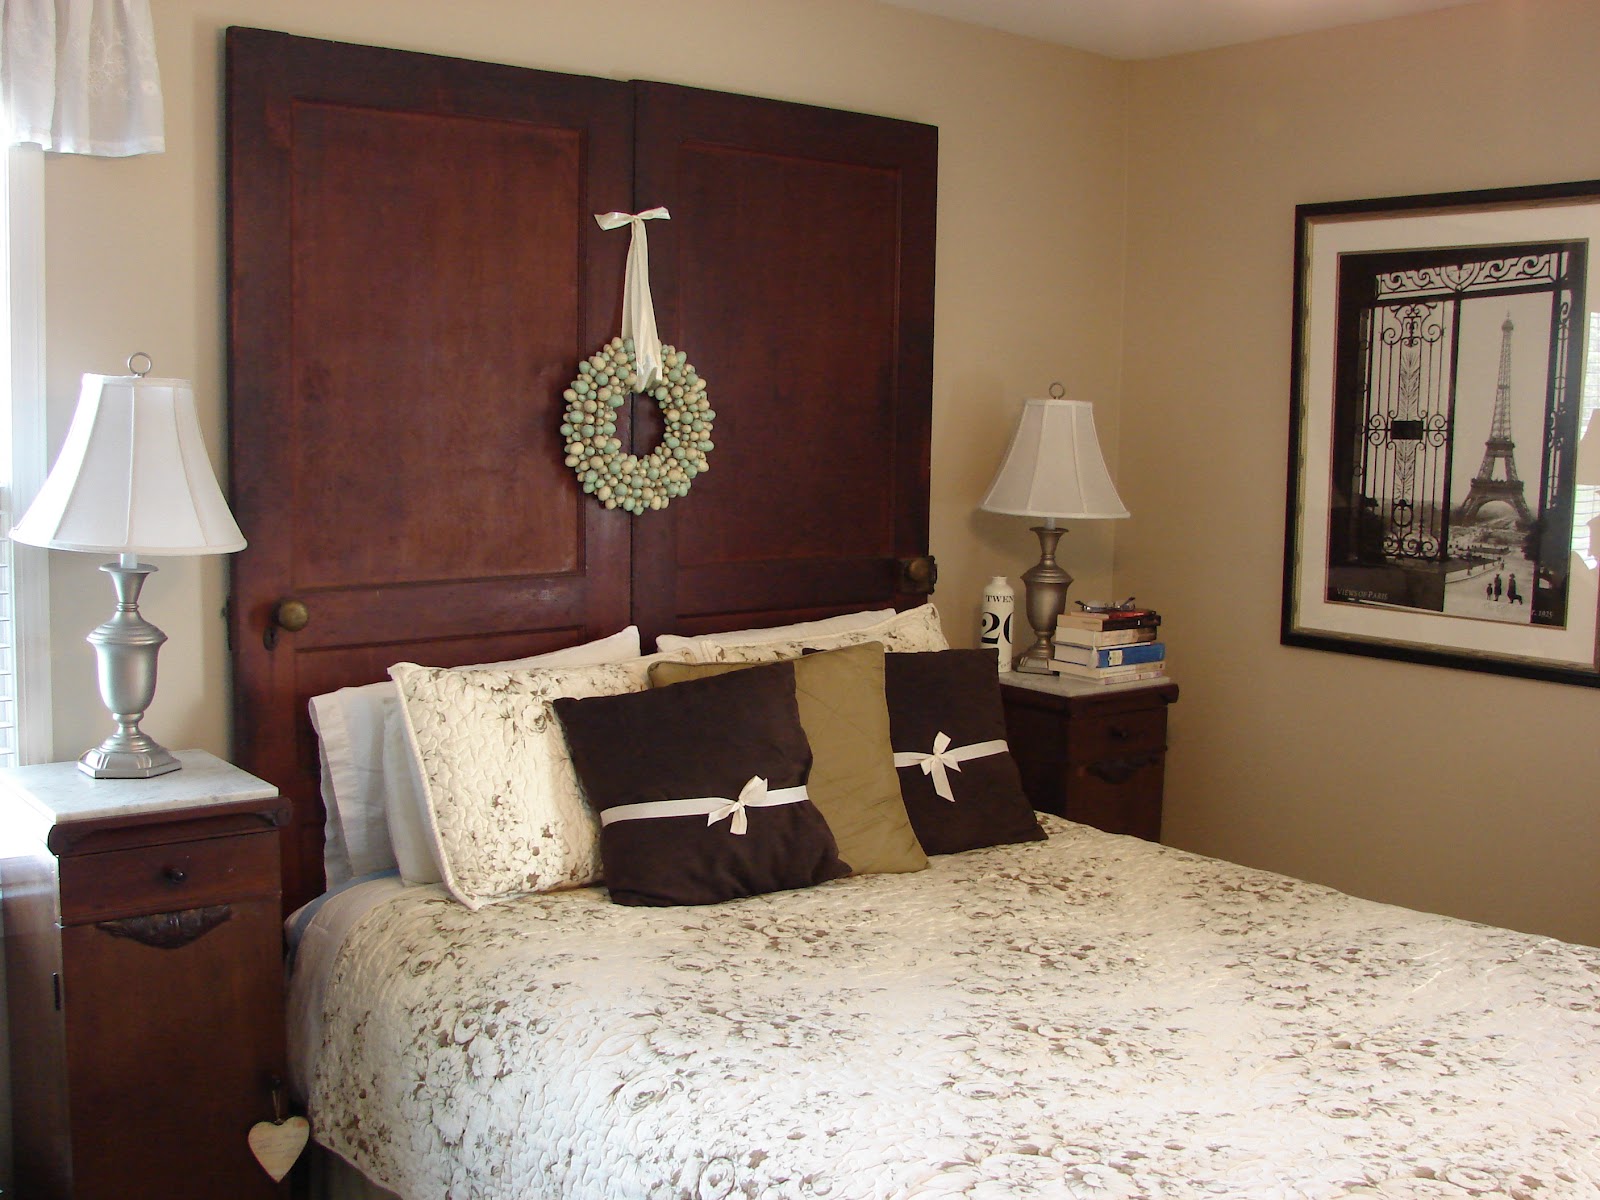
The doors went perfectly with my antique marble-topped nightstands, too.  And I dressed them up a bit with an egg wreath that I already  had.  

If you look at the doors head-on, one door is slightly lower than the other.  When Vince hinged them together, matching them on the panels and at the bottom we realized that one must have been shaved down a bit to fit a previous doorway.  I like it, it gives them more character!


Around the room...

This is a small antique bookcase that holds my collection of Grace Livingston Hill and Emilie Loring books.  


Pictures from our wedding day hang above the bookcase.


These are two of my favorite things: vintage drawings of Paris in the original frames with bubble glass.


I'm loving my new full-length mirror!  It stands on the floor and leans on the wall.  (See the little natural wood  chest of drawers beside it?  That's getting a makeover this spring!).


And yesterday I finally got my desk cleaned off!  SO happy about that!  I don't use this desk a lot, but it's where I keep my stationery and I love to sit here and write letters....when I get the chance.


And that's our master bedroom.  I'm loving it, it's such a peaceful room.  So much better than the dark dungeon it was before.  

Thanks for dropping by!


Popular posts from this blog

The Making of an Egyptian Death Mask

We are learning all about the ancient world this year with Story of the World I and loving it! We've been learning a lot about Egypt, of course, which is completely fascinating. Most recently we have studied the New Kingdom of Egypt, which includes the story of King Tut. So we decided making an Egyptian death mask in the style of King Tut's would be a fun project. First since it was too cold at the time to paper mache in the garage (it probably would have frozen instead of dried-ha) and it was too messy to do it in the house, we decided to pick up a couple of cheap craft masks at Hobby Lobby. Next we cut out cardboard shapes to complete the shape of the death mask, attaching them with hot glue. Vince even put a little detail on the *beard* with the hot glue per The Princess' request. Then the kiddos started to paint them with this metallic gold tempera paint. It worked okay for the cardboard, but would not coat the plastic of the mask. We thought maybe a second coat ...

Door Hanger Chore Charts

My kids have had a chore chart for a while.  It's one of those magnetic boards and they share it.  However, it's not by their rooms and often they (and I) forget to update it.  Plus it's a little bulky.   When I saw the concept of a door hanger chore chart on Pinterest, I loved it!  It was compact, right there were the kiddos could see it coming out and going into their rooms, and it costs almost nothing to make.   I headed over to one of my favorite stores: Hobby Lobby, of course.  They  have these little wooden door hangers for .79.  I also grabbed a couple of packets of decorative buttons for $1.99 each.  I already had the clothes pins and the paint so those cost me nothing.   I began by painting the door hangers (I used tempera paints because that's what I had).  Then I grabbed a fine point Sharpie and the clothes pins and started writing chores on them, making sure to write them correctly so they will ...

Fun With 4th of July Crafts: Part 3

I love my new patriotic front door wreath!! I had fun putting this together, although I must admit this is more of an adult craft than one for kiddos. I was inspired by this article in Family Fun magazine. I didn't have quite everything I needed for this one, but all I had to purchase was a few sheets of scrapbook paper and some double-sided tape. Then all I had to gather up were some scissors, regular Scotch tape, a ruler and some cardboard. First I cut four (5"x 6") pieces of each paper. Then by placing a piece of double-sided tape on one of the short ends of the papers, I rolled them into cones, pressing the seams together well. Then I cut a 10" circle out of cardboard and began to stick the cones on it. I used another piece of double-sided tape to stick the cones on, arranging them in a circular pattern. Next I used regular Scotch tape to attach them on the back to the back of the cardboard. After getting all the cones on, I was ready for my centerpiece. He...